Software
A lot of the magic of the telecine process is in the software. Frugality drove me to evaluate a lot of freeware programs to find the best tools without spending any money on software. Fortunately, there is a lot to choose from and I’ve put together a superb suite of software without spending a dime. Maybe my suggestions will save you spending all the hours I invested!
Initially, I used the freeware Stop Motion Animator program. It’s a simple tool to count captured frames and automatically assemble them into an AVI file. The programmable hotkey feature allowed me to use the keypad trigger described above.
But now I capture the movie continuosly, so I need a video capture program, not a frame capture program. There are many choices – I started by using VirtualDub (see below) in combination with a freeware tool called WcCtrl, developed for astronomical photography. WcCtrl allows camera settings to be adjusted during capture, displays numeric values for the settings, and allows multiple setups to be saved and reloaded.
This combination worked, but it was too awkward switching between the two apps, to start and stop and make adjustments as the movie scenes change. So I wrote my own capture app in Visual Basic, a task made easier by two wonderful freeware components… ezVidCap is a camera capture control object, and DSwcOpen is a camera control object (from the same author as WcCtrl). Both drop easily into a VB program and do all the hard work of accessing the camera, controlling captures and video file creation. That left me free to focus on workflow details and convenience of tweaking image adjustments during a transfer. The Visual Basic code for the app may be downloaded here… Project Files.
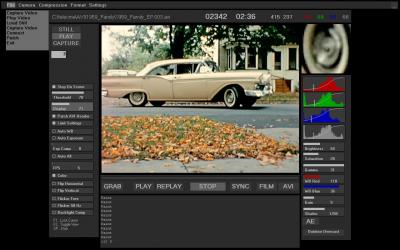
Some features of my capture app…
– Covers all the blue Windows junk on the screen. (When you adjust white balance with a lot of blue near the image, the balance comes out pretty blue!)
– App panel and controls are dark gray around the preview image, so it looks more like the movie will look on a flat screen TV. A slider allows all the controls to be dimmed for comfortable viewing of the movie.
– Controls to start AVI capture or film transport or both in sync.
– Automatically stops the transfer when the scene exposure changes more than an adjustable threshold. When the machine stops, adjust exposure settings and go again. The first and last 2 or 3 frames of the clip are easily deleted in post edit.
– Auto exposure process adjusts shutter time, gain and gamma to make best use of the dynamic range. The algorithm captures at each shutter setting, evaluates the histogram, chooses the best compromise between clipping at the high and low ends, then does the same process with gain. Finally, if there is still room at the low end, the gamma is turned down to move the bottom of the histogram down. Optionally restarts the transfer automatically when AE is complete, for unattended operation.
– Auto increments file number. Sets of files with sequential numbers are auto-merged in VirtualDub during post edit.
– Displays RGB and luma histograms of the image during transfer. Histograms make it a lot easier to fine tune the exposure settings.
– Magnifier displays a 4X portion of the image, for easy focusing.
– All camera settings are controlled by sliders on the main window. Settings can be adjusted over the full range or over a preset restricted range. Profiles of settings can be created, named and saved.
– Built in AVI player for instant replay of captured clips.
– Easy frame grab and save from either capture preview or playback modes.
I use the HuffYuv codec during capture. This codec uses lossless Huffman compression of the YUV video data from the webcam, so the captured files require about half the hard disk space of uncompressed data, but there is no image quality loss. It’s vital to avoid any lossy compression until all post processing is done.
Another interesting tool by the author of WcCtrl and DSwcOpen is WcRmac. This tool can reprogram the EEPROM in the Philips camera, to put it into raw capture mode, or to change default settings. The program will also display all the parameters set for the image process chain. I tried the raw mode, but didn’t get too far with that.
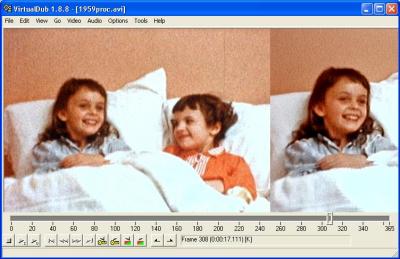
After the transfer, I edit the video file to remove splice frames and the few bad frames created when the transfer was stopped and restarted to make image adjustments. I use VirtualDub, a freeware video capture and edit program that is loaded with capabilities. This program handles huge AVI files quickly. It uses plugin filters to process the video, but the more powerful tool for that job is AVISynth, which works with VirtualDub to apply processing defined by a script to the video data before VirtualDub displays or saves it.
The post processing in AVISynth removes grain, noise, dirt spots and camera shake, then adjusts levels and sharpens. The resulting video looks better than the original film. Fred Van de Putte is the expert in this work – see his wonderful sample video here… Fred’s AviSynth comparison. I started with Fred’s AVISynth script and I’m experimenting with tuning it for the images I get with my system. The resulting video is amazing on a good LCD television! Here’s a before and after comparison clip from my machine…
ERROR: FLV player could not be loaded.
I made up a test loop of various scenes to evaluate process settings…
ERROR: FLV player could not be loaded.
My script is here… Project Files.
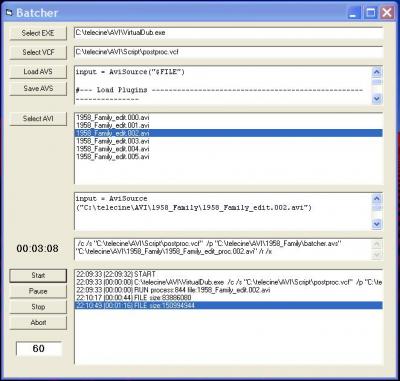
VirtualDub crashes sometimes, after processing a lot of AVI data, so I break up the edited AVI into segments of 1000 frames each and post process them one at a time. To save time and typos running the multi file process, I wrote a simple Visual Basic app called Batcher to create the AviSynth scripts and command lines for VirtualDub. Batcher launches VirtualDub for each segment, then watches for it to finish, or for the output file to stop growing. Batcher then terminates VirtualDub if it is hung, and starts it fresh for the next segment. The whole 3 to 4 hour process runs unattended, in spite of the glitches!
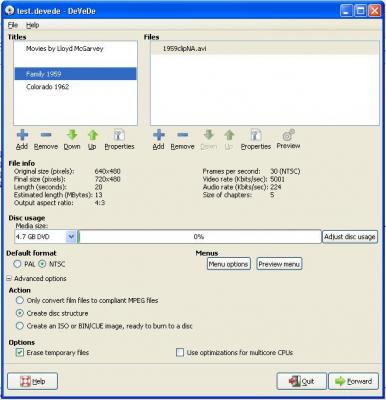
I am archiving the edited AVI files for each film on two hard drives, but for distribution to my family, DVDs are a must. There are a lot of programs to create DVDs, and I tested a bunch of them. Some are wonderful for creating fancy menues, but had some problems with handling the video files. For example, some won’t accept an AVI without a sound track, others created all black output files if the AVI parameters were not pleasing to the program, and others simply could not handle HuffYuv encoded AVIs. I wanted a freeware program and narrowed the field to DVDForger and DeVeDe. Both handled all my AVIs correctly. DVDForger is a lot more complicated to use, but provides extensive menu customization. DeVeDe is much simpler, while still providing full control of the video content. It’s menu creation is very limited but perfectly adequate for me, so that’s the program I’m using now. I’ve seen good reviews for some commercial programs, but I haven’t tried them.
I use DeVeDe to create the files that go on the DVD. It converts my HuffYuv encoded AVI files to VOB files, which are actually MPEG2 format. In addition, it creates IFO and BUP files which complete the structure of a video DVD. These files can be verified on the computer – played like a normal DVD – before burning to the disc.
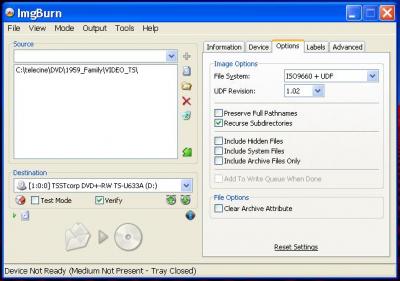
For burning DVDs, I use ImgBurn, another good freeware tool. Apparently, you have to know what you’re doing to create a DVD that works correctly in a normal DVD player. I don’t know what I’m doing, and with the Roxio software that came on my computer, the DVD would play, but skipped large portions of the movie. ImgBurn knows what it’s doing and makes good DVDs with the default settings. Once the movies are converted to VOBs, it only takes a few minutes to burn a DVD, so it’s easy to make multiple copies.
All DVD media is not created equal. Some of it is worthless, some is excellent, and some is in between. See this site for recommendations… digitalFAQ.

Hi,
When i execute the program “telecineProject.exe”
it will display a error window saying
“You dot not have an appropriate license to use this functionality”.
I think “DSwcOpen.dll” is not registrated!
Is this possible?
Keep on this very very good work!
Bye.
Comment by Anonymous — March 22, 2009 @ 12:15 pm
Yes, the dll’s have to be registered. Instructions are in the readme’s for each component, in the newest telecine_app.zip I have just uploaded.
Please let me know if it works.
Comment by Jim McGarvey — March 22, 2009 @ 7:05 pm
Thanks for posting this information. Are you processing for NTSC output? The script you are using doesn't seem to be in the avisynth filters folder. I was curious to see how you tweaked Fred's script. Thanks.
Comment by Anonymous — August 10, 2009 @ 9:55 pm
The script is in telecineFiles.zip – see postproc.avs. There isn't any special NTSC processing. The video is already 640×480 from capture. The script does change the frame rate to 14.985 fps so frames will be replicated without interpolation when making DVDs. This makes the movie play a bit slow, but it's not objectionable.
Comment by Jim McGarvey — August 10, 2009 @ 10:14 pm
Hi Jim, I too have been helped greatly by Fred in getting our Telecine up and running. I am having trouble though getting Avisynth to work properly. Where should I be putting the FFTW3.DLL file. Depan Estimate says that it cannot locate it in the folder that it is in now. C:/Windows/System32 Your results are very impressive as are Fred's. I am just hoping taht I can stick with this long enough to get it working as well as you have. Thanks,
Comment by Anonymous — August 21, 2009 @ 6:28 pm
fftw3.dll is in the same folder with all the other plugins, i.e. the same as depan. Did you get depan from my file download? There are multiple versions of AviSynth and these plugins floating around and they're not all compatible. I am using AviSynth 2.5, and it works with the plugins in my download zip, but other combinations may not work.
Comment by Jim McGarvey — August 21, 2009 @ 6:52 pm
<<<"I use DeVeDe to create the files that go on the DVD. It converts my HuffYuv encoded AVI files to VOB files, which are actually MPEG4 format. ">>>
No they're not, standard DVDs use MPEG2.
Comment by Anonymous — October 21, 2009 @ 9:08 pm
Very good article, have found it most interesting but am having trouble with your software. Have registered DSwcOpen.dll, and the 2 ocx files but when I run 'Telecineapp.exe' I just get the preview screen and the enlarged preview – nothing else. What have I missed?
Thanks and regards
Comment by Anonymous — November 1, 2009 @ 4:27 pm
Probably the Display setting is too low. Notice the slider marked "Display" in the screenshot. This slider controls the brightness of everything but the image windows. Try adjusting your monitor brightness until you can see that slider or try to adjust it blind with the mouse. If you get VB6 you can set it's default in the code.
Comment by Anonymous — November 1, 2009 @ 11:25 pm
Not the display setting. There simply isn't anything there except the 2 image screens. Clicking randomly with the mouse produces some odd effects (cursor changes to a text cursor, or a narrow box appears, etc) as if there is an invisible control or text box on parts of the screen but no changes can be made. I have tried the software on 4 different computers (all different hardware/graphic cards) with the same result.
Comment by Anonymous — November 2, 2009 @ 11:23 am
I rebuilt the exe with Display setting at 80. Please try it again and let me know.
Comment by Jim McGarvey — November 2, 2009 @ 1:55 pm
'Display' at 80 did it. Now I can see why you thought adjusting the monitor brightness might affect it! Thanks for a quick response – very impressive!
Comment by Anonymous — November 2, 2009 @ 3:30 pm
Hi, i new in image VB6 , how can i use your code to just suit to my case.
For example i;m using a logictech camera. i create a button in VB , when i press the button the camera will autocapture an image with the size of 320×280(jpeg) and save in desktop
Comment by Anonymous — November 8, 2009 @ 6:53 am
You probably don't want to use ezVidCap, since it's intended for video capture, not still. In my app, the live preview image can be grabbed and saved, but as a BMP, not JPEG. You should look for an activeX control that is for still captures.
Comment by Jim McGarvey — November 8, 2009 @ 4:33 pm